Preferences
The preferences dialog with all the settings that controls Replays automatic behavior.
General tab
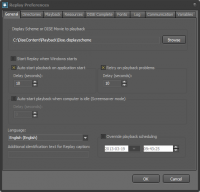
Display scheme or DISE movie to playback
- The first (and most important) setting is which display scheme or DISE Movie that Replay should play.
- If you are setting up a DS/Pro system, you should point this file to the display scheme file in the Destination directory of the Probe download location, named after the destination in Bridge.
- This sounds more complicated than it is, here is an example to clarify it.
- The destination in bridge is named NewYork.
- Probe has one download location that specifies a Destination directory called C:\Content
- Then, the complete filename here will be C:\Content\NewYork.displayscheme
Start Replay when windows starts
- This will enable Replay to start automatically when windows starts.
Autostart playback
- If you enable this option, Replay will start playing automatically as soon as it starts. This option should always be on, so that Replay recovers automatically, for example after a power loss to the Player PC.
- During Test and Setup, it can be nice to disable this option temporarily, but remember to turn it on again.
- You can specify a delay before playback starts. If you do, Replay will display a dialog at startup, informing you about the delay and counting down.
- This is recommended if the display drivers have not properly initialized the display adapters before Replay is started at system start-up.
Retry on playback problems
- If this is enabled Replay will try to restart playback if a fatal playback problem occurres
Auto start playback when computer is idle (Screensaver mode)
- Replay can be set to automatically start playback when the computer has been idle (no mouse or keyboard activity) for a number of seconds. When this feature is enabled, playback will also stop as soon as keyboard or mouse activity is detected.
Language
- Select what language Replay will use
Additional identification text for Replay caption
- Replay name is the local name of the Replay application, as it will appear on the task bar. If you are running several Replay applications on the same Player computer, this is a nifty way of distinguishing between them.
Directories tab
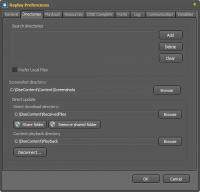
Search directories / Base paths
- Replay is usually looking for content in the same directory as the display scheme, and the sub directories from there.
- With this setting, you can add additional directories where Replay will search for files if they cannot be found in the original place.
- When loading content Replay will look at some different paths to find files, in the following order:
- The directory of the selected Display Scheme or DISE Movie that you selected.
- The Base Paths.
- The original path of the file, on the manager.
- Example:
- Let’s say you have specified 2 base paths:
- C:\Content\Files
- C:\Somewhereelse\Files
- The following file was added in the Composer:
- C:\DISEContent\Data\Content\TextFiles\TickTxt.txt
- Replay would then look for the file in the following places:
- <DisplaySchemeDir>\C\DISEContent\Data\Content\TextFiles\TickTxt.txt
- C:\Content\Files\TickTxt.txt
- C:\Somewhereelse\Files\ TickTxt.txt
- C:\DISEContent\Data\Content\TextFiles\TickTxt.txt
- Base paths can be useful in cases where you don’t want to send out big content files (e.g. videos), but instead pre-load the players with these files already before deployment.
- Add
- Add a path to a directory where Replay will look for content
- Delete
- Delete a previously added path
- Clear
- Delete all previously added paths
- Prefer Local Files
- This setting will make local files (found in the base paths) override files that are sent out from Bridge. This is a rare (and possibly dangerous) setting, so be very careful, since this affects everything Replay will play.
- The search order from the previous example would be:
- C:\Content\Files\TickTxt.txt
- C:\Somewhereelse\Files\ TickTxt.txt
- <DisplaySchemeDir>\C\DISEContent\Data\Content\TextFiles\TickTxt.txt
- C:\DISEContent\Data\Content\TextFiles\TickTxt.txt
Screenshot directory
- During playback, it is possible to generate a screen shot of the output by pressing the Print Screen button on the keyboard.
- This works almost like the Snapshot button on the main window, except that the screen shot will be saved as a file instead.
- This setting specifies the directory where the image is going to be saved.
- The image will be saved as a PNG-image with the current resolution of the output device.
Direct update
- When using DISE Discover these controls configure the different folders used.
- Direct download directory
- This is the folder where files will be uploaded to from a client of DISE Discover, this folder should normally be shared from your computer. You can share the folder from here, or remove the share if you are no longer going to use DISE Discover.
- Content playback directory
- This is the folder where files for playback will be stored. When an update comes through DISE Discover, files will be moved here and playback of those files will be from this folder.
- Disconnect
- When operating using DISE Discover, each Replay application will be locked to a certain DISE Discover client, and will not accept connections from any other client. You can use the Disconnect button to remove this lock, to be able to connect from another DISE Discover client.
Playback tab
Number of scenes to cache in advance
- During playback, Replay will “work ahead”, loading scenes, resolving data connections, loading fonts, images and video etc. The reason for this is that when it’s time to view the scene, everything is ready to play, and there will be no interruptions, or stutter in the playback.
- This setting will allow you to adjust how many scenes in advance Replay will work. The default value is 5. There are two reasons why you would like to change this setting.
- If your scenes are extremely short, maybe just 5-10 frames, and at the same time complicated with video or heavy images, you might want to increase this number to make sure that playback will never “catch up” with the rendering process.
- If your playback is relying on extremely real-time data, you might want to decrease this number. Since images are rendered in advance, they will be “old” when they are displayed. With a shorter number, the age of the rendered data will also be less.
- If you use the Playback Monitor during playback, you can see how Replay renders scenes in advance and places them in a cache.
Default update behavior
- When updates are downloaded by the Probe application, Replay is informed that an update of files needs to take place.
- This setting tells Replay when to apply these updates.
- The alternatives are:
- Immediately – Usually not recommended, since it might interrupt playback. It is however the quickest and most “real-time” update method.
- At the end of current scene – The default setting.
- At the end of the current movie – If it is important that all the scenes in the movie are played together in a sequence, this is the preferred setting. This can be the case, for example if your scenes relate to each other to form a message.
Default video renderer
- This selects the default video renderer that will be used for all videos that are marked to use the default.
- Choose between:
- VMR9 - This is the default selection. It offers the best performance and also enables some hardware accelerated decoding on DXVA1 enabled hardware.
- Internal - Special renderer that should be used for synchronized multiscreen setups. It offers much better frame sync than VMR9, but will consume more CPU and graphic card performance.
Frame calculation
- Replay are displaying different number of frames per second depending on the output settings. During playback, Replay has two different methods of calculating which frame to display.
- Calculate frames based on real passed time.
- Calculate frames based on the number of frames displayed.
- Normally, both of these settings will generate the same results.
- The difference will only be noticed if the scenes are too heavy for the computer to display in real time.
- If the frames are calculated based on real time, heavy scenes will “jump forward” to keep up with the time that has passed. :Playback will “stutter”, but the timing will be accurate.
- If the frames are calculated based on the number of frames displayed, heavy scenes will “slow down” the display. The display will be smoother, but maybe look like slow-motion, and the timing of the scene/movie will not correspond to real time. For example, a 15 seconds long scene might actually take 20 seconds to display.
Preload
- This setting controls what Replay will show during preload-time.
- When playback is starting, the first thing Replay will do is to preload a number of scenes and put them into the playback cache.
- After the cache is filled, the actual playback starts.
- Show progress bar – This setting will display a progress bar during preload, to visualize that playback is about to start.
- Background image – If you specify an image here, this image will be displayed during playback time.
Dim screen
- This function will add a black mask on top of your content, with the transparency you select (in percent). This can be used for lowering the brightness on LED screens.
Video/Flash setting override
-
- In a DISE NoBorders system, the master will send out synchronization messages to make sure video objects are frame-synched. Disabling this may cause video to be out of sync but will improve overall performance.
- Skips the frame synchronization signal for Flash objects coming from the master
-
Resources tab
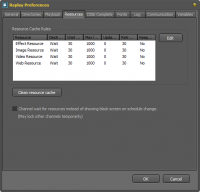
For all types of objects in the file system, Replay dynamically loads them as external resources at runtime.
Some objects need data to be located and loaded before display.
To avoid that the display gets interrupted by long loading/download times, Replay stores this data in a cache. This will optimize the performance.
This page holds detailed settings for each of Replays 4 caches.
The settings can be used to fine-tune playback, if your DISE movies are too heavy for your hardware.
Clean resource cache
-
Channel wait for resources instead of ...
- Will cause the playback to wait during a schedule change, to avoid the black screen.
The normal user will never need to change these settings. They are preset to values that will give the best performance for most material.
 Read more: Resource loading
DISE Complete tab
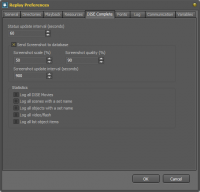
If you have DISE Complete, Replay can send status reports and playback logs to the database. This is useful for two reasons.
- To monitor that DISE Replay is working and that there is no problem with the player. If there is problems, to detect and identify it.
- To get detailed information on what content has been played and when. This information can later be used for billing purposes.
Status update interval
-
Send screenshot to database
- Replay has the ability to send screenshots of the playback to the database, so that an operator at the central can see the DISE Replay output.
Screenshot scale
- The resolution of the screenshot will be the same as the current output resolution. If the resolution of the playback is high, it is a good idea to scale down the screenshot somewhat before sending it to the database.
Screenshot quality
- Equally, the compression quality can be higher for a screenshot which is just to be used as a verification of playback.
Screenshot update interval
- How often the screenshot should be taken and sent to the database.
Log list object items
- Will log start and stop time of files (images, videos etc) in lists.
Log all DISE Movies
- Will log start and stop time of all DISE Movies in the display scheme.
Log all scenes with a set name
- Will log start and stop time of all named scenes in the display scheme.
Log all objects with a set name
- Will log start and stop time of all named objects in the display scheme.
Log all video/flash
Fonts tab
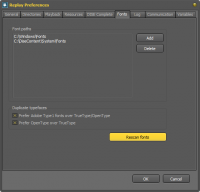
Font Paths
- By default, Replay will use the fonts that are installed in Windows as well as give you the option to automatically use the font files that are distributed with your content.
- You can specify what directories that will be used by the Font Engine in DISE. You can specify several directories, and you can remove the WINDOWS\Fonts directory if you want.
- It is important to remember that the fonts you use should exist on the Player side, otherwise text may not be displayed properly during playback.
Prefer Adobe Type 1 fonts over TrueType/OpenType
- If enabled select a typeface that uses Adobe Type 1 font technology before a TrueType typeface with the same name.
- Otherwise the TrueType/OpenType technology will be preferred.
Prefer OpenType over TrueType
- If enabled OpenType typefaces will be selected, rather than a TrueType typeface with the same name.
- Otherwise TrueType typefaces will be selected, rather than an OpenType typeface with the same name.
Rescan fonts
- If you made any changes on this tab, then you will either have to restart the application or press this button (This might take a couple of seconds)
Read more: Font support
Log tab
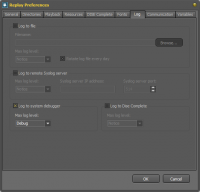
Log to file
- Save log data to a log file
Max log level
- The maximum message level to include in the log
Limit number of lines
- Enter the maximum number of lines to store. If the number of lines is above this value old lines are removed when new are added.
Log to remote Syslog server
- Enable this to send log messages to a syslog compatible log receiver. For example most Linux and Unix systems will be able to receive this data.
Syslog server IP address
- IP address of syslog server.
Syslog server port
- IP port of syslog server. The default value is 514.
Log to system debugger
- Send log messages to the system debugger. You can watch these messages with DebugView.
Log to DISE Complete
- Send log messages to DISE Complete database.
Communication tab
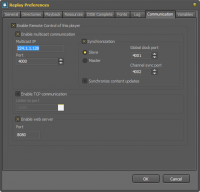
Remote Control
Replay can be controlled remotely over the network.
This option is often used in special applications, where a specific event should start a specific DISE movie.
You can control which movie to play, start, stop and pause.
The commands have to be sent as multicast messages.
Multicast IP
- Is the multicast IP that will be used for communication.
Port
- The port to use for communication.
Identity filter
- This filter is used for security or to provide extra functionality. Replay will only accept multicast messages from sources that has an identity that do match the identity filter. You can use a * wildcard, or regular expressions in the filter.
Read more: Remote Control
Synchronization
- Enable network playback synchronization. This is used to synchronize multiscreen setups over more than one computer.
- Replay can either be in Master mode or in Slave mode. You must have only one master for each multiscreen setup. The master computer sends clock data and scene position data to the slaves.
- If you have several multiscreen setups on the same multicast IP you can change the Global clock port and the Channel sync port so that they don't interfere with each other.
Enable web server
- If needed you can enable the Replay application internal web service. Through this web service you can access a small API and get some status information about Replay and the playback.
- The web service is also required when using DISE Discover, so in those installations this will be enabled by default.
Variables tab
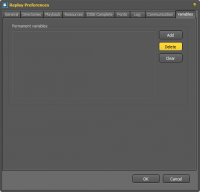
Here you can add and remove the permanent variables configured for this system.
Variables can be used together to provide context based scheduling.


