Hardware setup
The Q-matic device is connected to the computer using a serial cable.
If there is no serial port on your computer you need to use a usb serial adapter.
Connect the cable to the RS-232 connector on the Q-matic device.
Test
To find out which com port is used for the connection, start Device manager, Ports (Com & LPT).
We can test for Q-matic device data input using a terminal emulator such as HyperTerminal (XP), or PuTTY (all versions)
 Read more: PuTTY Download Page
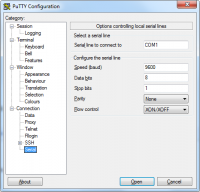
We create a new connection using the below settings.
Bits per second: 9600. Data bits: 8. Parity: None. Stop bits: 1. Flow control: None.
When pressing the arrow buttons to display the next number on the Q-matic device, we should see data like 001011 in the terminal.
DISE setup
This guide explains how to display a queue message using the supplied example files.
DISE Parser
Supplied with DISE Parser is a Q-matic example.
- Select File > Import and the file "Samples\QMatic.dpmodifiers".
- You need to change the settings for the Q-matic modifier (Right-click > Settings) to your com port.
- Make sure that the other settings are as above.
- You also need to select the service type that the Q-matic system uses.
- By default, this is 1. Which service type is used is chosen in the settings for the XslModifier (Right-click > Settings).
- Select one of the supplied files QMaticServiceTypeX.xsl, where X is the service type to use. If unsure, leave it as 1.
- By default implementation, the Q-matic modifier is set to listen for incoming data every 50 milliseconds. When data is received, the message is extracted and three Remote Control signals are sent out.
- The first will be the message received.
- Second, a sync signal will be sent out to only show this message.
- Third, a message will be sent out to trigger the channel the message will appear in.
- Under Service control, select Install and then Start.
- This will start DISE Parser as a Windows service.
 Note: If you previously selected Test, it will lock the com port and you will get an Access denied message when trying to start the service.
- To have the service start automatically go into File > Settings and tick the Autostart service at system start checkbox.
Test
- In DISE Replay Preferences, make sure that it is set to receive multicast signals by going into the Communication tab.
- Next, select Information > Remote control view and press an arrow button on the Q-matic device. There should be three messages appearing.
DISE Composer
- Create a DISE Movie where the queue message will appear.
- For the message itself, insert and data connect a text object.
- In the data connection source, enter #RC#QMatic. It will dynamically read the text sent via the remote control channel with the QMatic header.
DISE Bridge
- Create a new channel named QMaticOverlay.
- Add the above DISE Movie to it.
- Schedule the Channel on the remote control signal DISEParser|ShowQMaticOverlay with a long validity time.
