Create a floating image
From DISE KnowledgeBase
Step by step
- Add a white background.
- For the "horizon", insert a square blue shape.
- Resize it so it stretches over the horizon.
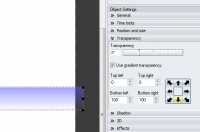
- Right-click, select Edit object settings, and go to the Transparency tab.
- Here, select Use gradient transparency and click down the down arrow in the transparency direction tool.
- Lock the position of the shape (Right-click > Lock > Position > of selected objects).
- Insert the image.
- Duplicate (CTRL+D) and flip (from the General tab in the Object settings) the image.
- Place the flipped image at a distance below with the horizon inbetween.
- Right-click the flipped image, select Edit object settings, and go to the Transparency tab.
- Here, select Use gradient transparency and click down the down arrow in the transparency direction tool.
- Set the transparency to 60.

- Select both images. Right-click and select Movement and then Advanced movement.
- In the Timing tab, select In and out move and enter 0:10 in the In duration and Out duration text boxes.
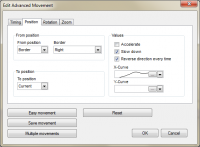
- In the Position tab, select Border and Right under From position and Current under To position.
- Under X-curve, select the bottom predefined curve.
- Now it's time to add the "floating" movement. Right-click the upper image and select Movement > Multiple movement > Add > Advanced movement.
- In the Timing tab, select Single move and enter 0:10 in the Start time and 20:00 in the Stop time text boxes.
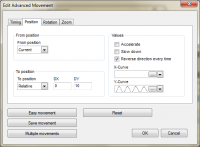
- In the Position tab, select Current under From position and Relative under To position.
- We want it to move subtly up and down, so enter a value say 10 in the Y box.
- Under Y-curve, select the top predefined curve.
- For the flipped image, repeat the last five steps but enter -10 in the Y box, since we want the mirror movement as well.
Result


