- Setting up DISE Probe for the first time, there is not that much that needs doing. We need to specify from where and to where to download content, and then to start downloading.
- Select Settings > Preferences. You are presented with the Probe Settings dialog.
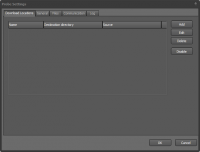
- Click Add. The Edit download location dialog is displayed.
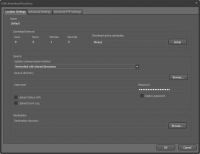
- Enter a name for the download.
- Under Update communication method, select either Networked with shared directories or FTP (depending on the upload method in DISE Bridge).
- If you select to use a network share, either browse or enter the path to the shared folder under Source directory.
- Under Destination directory, browse or type in the path to the local folder to download to.
 Note: It is always recommended to download material to a folder that is local to the player. In addition, the destination folder should not be the same as (or subfolder to) the source folder.
- Click Ok twice to go back to the main Probe window.
- Hit the Start button. Probe will begin downloading your files after a few seconds, and after that, by default, will check for updates every minute.
- You are done! You can now leave Probe open and go on to setup DISE Replay to playback the downloaded material.

