Overview
In this tutorial we will create a navigation menu with buttons that the user can click to get to different sections. We will start by looking at a typical menu system:
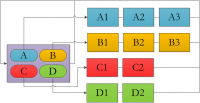
The leftmost purple scene in the example is a "menu" type scene which will loop until the user clicks any of the A, B, C or D buttons. A click of the A button will go to the relevant scene (A1). Once the A3 scene has ended playback will return to the menu scene.
We will be using the interactivity features in DISE, and go through two different ways of approaching it:
- In which everything is kept in a single DISE Movie as separate scenes and navigation can only be at one place at a time.
- In which the menu and sections are in different channels which can be independently accessed. The advantage of this approach is that we don't need to continuously go back to the menu scene, since it will always be visible.
Separate scenes
Step-by-step
- Create a new DISE Movie by selecting File > New.
- Select a resolution.
- Go to the Scene View and right-click the first scene, and select Scene properties.
- In the Scene properties, give this scene a name such as "Menu".
- In the scene view, click the little arrow in the top right corner of the scene thumbnail, for the "Menu" scene.
- It switches to a looping arrow, indicating that now this scene will loop instead of continuing to the next scene.
- Insert a new scene.
- Call this scene "A1".
- Right click in the edit area for this scene and select Add background. Set the color to dark blue.
- Insert a new scene.
- Call this scene "A2".
- Right click in the edit area for this scene and select Add background. Set the color to green.
- Insert a new scene.
- Call this scene "B1".
- Right click in the edit area for this scene and select Add background. Set the color to yellow.
- Insert a new scene.
- Call this scene "C1".
- Right click in the edit area for this scene and select Add background. Set the color to red.
- Insert 3 button images by selecting the Library tab to the left and browsing to Images > Dialogblock. Drag 3 images in on your edit area.
- Select the first "button" image.
- Go to the Interactivity tab.
File:RibbonInteractivityTab.png
- Select Go to scene and for Scene select "A1".
- Select the second "button" image.
- Go to the Interactivity tab
- Select Go to scene and for Scene select "B1".
- Select the third "button" image.
- Go to the Interactivity tab
- Select Go to scene and for Scene select "C1".
- Notice that now in the timeline for the scene, you will have three image objects ("buttons") which show a little "I" in the bottom corner. This indicates that it reacts to an event.
- Select the Play all scenes
 button to preview.
- Click on one of the buttons. It will go to the specified scene.
- But wait! The scenes A1 - C1 will just continue to the next scene. We need to fix this somehow.
- Select the scenes and in the Movie tab in the ribbon, under Playback mode, select "Loop".
- We also need to add some kind of "back" functionality.
- Insert an image in scene A1 that will be our "back" button.
- Go to the Interactivity tab.
- Select Return to previous scene.
- Copy this object to scenes B1 and C1.
Separate channels
Here we put the menu scene in its own channel and the scenes it is to control in another channel. This way the menu scene will always be visible.
Step by step
- In DISE Composer, we begin by creating a DISE Movie with 4 scenes.
- All scenes should be made to loop, by clicking the small arrow icon in the thumbnail, or by going to the Movie tab in the ribbon and select "Loop" under Playback mode.
- I make the first scene, Scene 1, white.
- This scene will be shown on startup, when no button has yet been pressed.
- The rest, Scene 2, Scene 3 and Scene 4, I make the same background color as the scenes created in the previous exercise.
- Save the DISE Movie as "Gallery.disemovie".
- I then create a new DISE Movie, with the same resolution.
- For this I built on the menu scene (the first scene) I created in the previous exercise.
- For the three buttons right-click and select Events or go to the Interactivity tab and select Advanced Events.
- Edit the current click event or Add a new one if there is none.
- In the Event settings dialog, make sure that "Go to scene" is selected under Command.
- For the first button, type in "Scene 2" for Scene name or ID.
- In the Channel name field, type in "Gallery". This will be the name of the channel where the "Gallery.disemovie" file will be.
- For the second button, type in "Scene 3" for Scene name or ID.
- In the Channel name field, type in "Gallery".
- For the third button, type in "Scene 4" for Scene name or ID.
- In the Channel name field, type in "Gallery".
- Save the DISE Movie as "Menu.disemovie".
- We move on to DISE Bridge.
- Create a new destination which you call "Kiosk".
- Rename the "Main" channel that was automatically created to "Gallery".
- Put the "Gallery.disemovie" in this channel.
- Create a new channel by click Add > Add channel in the ribbon.
- Call this new channel "Menu".
- Put the "Menu.disemovie" file in this channel.
 Note: The "Menu" channel will be below the "Gallery" channel in the list but this means it will be on top during playback.
- Send out and play in Replay.


